
Splits
Splits
Journeys are meant to tell a story. With splits and actions, you can customize your journey to meet your business goal by personalizing to your customers based on your criteria. Options include:
- Branching: Route contacts into different branches so you can take different actions on each group
- Experiment: Try different actions on different groups that are split randomly to determine which marketing tool will work best
- Join: Combine contacts from branches and variants back together after a split
Branch
If you'd like to offer the contacts entering your journey tailored experiences based on segment or event membership, you can split the group by Branching.
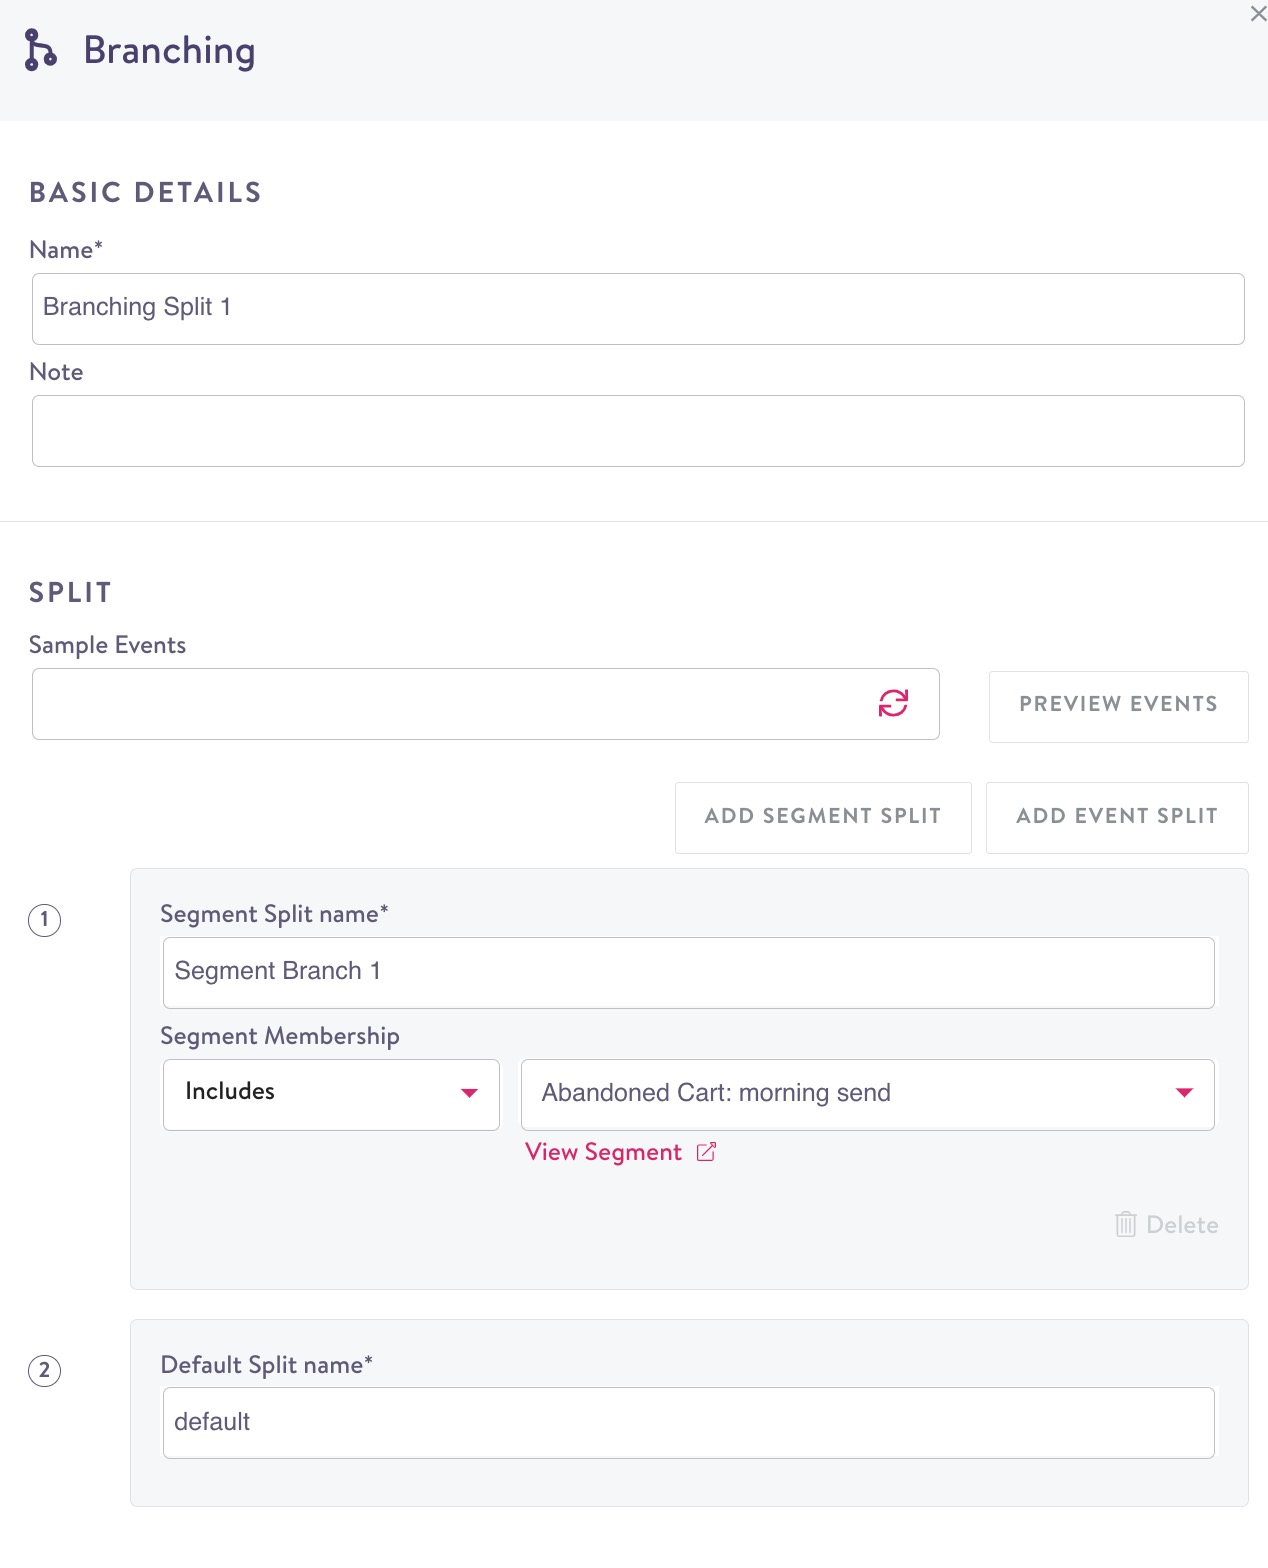
- Add a Branching step. The Branching Details pane opens.

Branching
- Name your split. Add a note if desired.
Pro tipUse your mouse to zoom in and out and drag the canvas around. This is especially helpful when you have a larger campaign:

Drag and Zoom In the Editor
- You can include up to 10 branches, including the default branch. By default, you have a Segment Split and a Default split, but you can choose from both Segment Splits and Event Splits. To learn more about event splits, and event based branching,click here. For a segment split:
- Give the branch a unique name.
- From the first drop down, choose includes to route any contacts in that segment to this branch. Choose Excludes to keep any contacts in your specified segment from being routed to this branch.
By default, you have a Segment Split and a Default split, but you can choose from both Segment Splits and Event Splits (if you're entry criteria is event based).
Remove BranchesIf you have more than two branches, you can remove any except the default branch as needed:
- Click the trash can icon. If there are steps associated with that branch, those steps will also be deleted.
You must have two branches remaining after you delete.
- Choose a Default Branch Name for any contacts not identified in the other branches to route to.
- Click anywhere in the editor window or click X to close the Branch Details pane.
You can branch at any step in your journey; repeat steps 10-11.
- To edit a branch, click the specific branch box.
- To delete a branching step entirely, use the branching box drop-down arrow, then click delete. Select a branch to keep and the remaining ones will be deleted.

Delete Branch
Branch orderingBranch conditions are evaluated as they appear in the sidebar from top to bottom (or left to right on the canvas). Contacts will be routed to the first branch for which they meet the criteria. All contacts that do not meet the criteria of any preceding branches will be routed to the default branch.
Experiment
Run experiments to determine the most effective marketing tactics. For example, you could offer free shipping on Group A and a discount code on Group B to see which option increases sales the most. While branching assigns contacts based on specific criteria, experiments routes contacts randomly based on the configured weights.
- Add an Experiment. The Experiment Details pane opens.

Experiment
-
Name the experiment and include a note if desired.
-
If you'd like to include a Holdout Group (a control group), toggle the option on and specify what percentage of contacts should go to the holdout group.

Variants
- Click Add Variant for each variant you want to include. You must have at least two variants or one variant and a holdout.
- Name each variant uniquely and either specify what percentage of contacts should go to this variant or click Distribute Evenly to auto-populate the percentage.
Branch populations can varyWe use a function to randomly distribute customers across branches while maintaining the relative splits you specify. This randomness ensures that we're not biasing your experiment in any way. If your journey is tiny, this can lead to the actual distribution of contacts being off from what you specified. If you see this, don't be alarmed! As your journey grows, the percentage of contacts across each branch will normalize.
- Exit the details pane then select the corresponding action for the variant by clicking the +. You can choose to add more branches, experiments, or send communication to each variant. You can also choose to have no action for the variant. This is the recommended setting for holdouts.
- To remove a variant, click the trash can icon. An experiment must have at least two variants or one variant and a holdout.
- To delete an experiment step entirely, use the experiment box drop-down arrow, then click delete. You will be asked to select a variant to keep and the remaining ones will be deleted.
Be mindful when deletingDeleting a branch or variants with many steps connected deletes those steps. Deleting an entire split deletes all branches/variants except for the one you select to keep. This action can't be undone.
Join
Once you've branched or experimented, you may want to rejoin two branches or variants to avoid duplication if contacts will get the same experience from that point. Some examples for using a join are:
- You want to run an experiment for a specific step (e.g. a subject line test) and then let all contacts continue to the same step after that.
- You make a branching split based on customer preference (e.g. geography), but the next step is relevant to all contacts (e.g. a tutorial).
- Add a Join step. The Join Details pane opens. (Join is only an option if you have a previous split established.)

Join icon
- The branch or variant you are joining from highlights in pink. Click the + for to select the steps that you want to join it to.
- At the bottom of the editor, click join:

Join Two or More Branches or Variants
From this join, you can branch, experiment, join, or take action.
Edit join
To edit a join and add or remove connected steps, click the join box and select Modify Join. This is helpful when you add a new branch or variant to an already existing split.
Insert a Join
You can insert a join between two existing steps. This is helpful if you’re adding a new experiment in the middle of an existing journey. Just click on the + sign between two existing steps, and select the branch or variant that you want to join to.
Note, you can't join to a descendant, since that would create a loop in the journey.
Remove a Split
.gif")
Remove a Split
To remove a step that has split into branches:
- From the drop down click Delete.
- You're prompted to choose which branch you want to keep; the other will be deleted.
Updated 9 months ago