Add Steps and More
Add steps
Journeys consist of steps, which are added by clicking on the + sign. You then get to pick which type of step to add. There are different kinds of steps:
- Delays: control when contacts advance, including the time of day.
- Splits: split contacts into two or more paths. There are two kinds: branching and experiment splits. Joins let you bring contacts together into a single path after a split.
- Actions: take an action, such as sending a message.
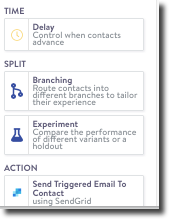
Steps
You can also insert delay and action steps between existing steps. The + sign will appear when you hover over the line connecting the steps.
Every step has a Name (required) and Note (optional). There can't be two names with the same name.
Note: integrations currently available for Journeys 2 are Airship, Braze, Facebook, Iterable, Klaviyo, Oracle Responsys (triggered email and PET), S3 SendGrid, SFMC (Triggered Email), SFTP, Simon Mail, Twilio, and Webhooks.
Add a delay
- If you'd like to delay before starting the next step of your journey, add a Delay.

Delay
- The delay details window opens:
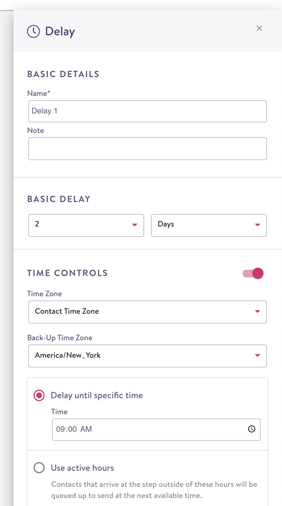
Delay Details
- Basic Details: Name your delay. Add a note for yourself or team, if needed.
- Basic Delay: Choose a delay time in minutes, hours, or days.
- Time Controls (optional): Additional controls around the time of day and respective time zone to advance to the next step.
There are two options under Time Controls:
- Delay until specific time (only available for day delays): A specific time of day to advance contacts (you can think of this as 'send time').
- Use active hours (available for all delay settings): A window of time where contacts can advance. This is useful e.g. if you want to avoid messaging contacts during the night. If a contact is set to advance at a time that falls within the window, they will do so. If a contact is set to advance at a time outside the window, they will be queued up until the window opens and advance then. The window for active hours must be between 4 and 20 hours long.
If not time controls are set, the delay will be just the specified duration. In the case of day delays, that duration is calculated as 24-hour increments
You can add a delay at any step in your journey; repeat steps 10-11. You can also add a delay even after you've set up subsequent steps by clicking on the + on the connector line:
Controlling time of day
- What you would configure under "Send time" in flows previously, is now defined under delays.
- Day delays have additional settings for the time of day. By default, a day delay advances at the same time of day (i.e. in 24 hour increments). You can also configure a specific time when contacts will advance from the delay. In that case, the number of days is based on calendar days in the configured time zone.
- If you want to configure a specific time of day without additional delays, you can set a 0 day delay and then define the send time.
Use local timezone
Instead of specifying the same timezone for all contacts, you load contact-level timezone data into Simon and use that to specify the timezone in a delay step. This way, the time settings for each contact will be based on their timezone.
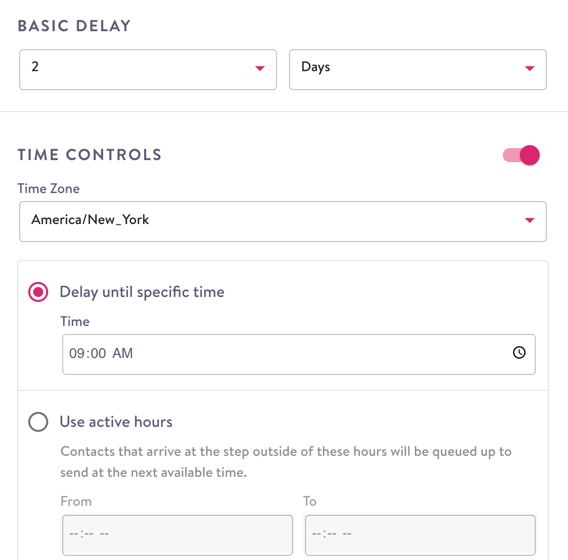
You can use the local timezone for each contact to specify the time of day.
Using local timezone requires that you have timezone data for your contacts. Contact Simon if you have that data and would like to set it up to be used in journeys. Simon accepts standard database timezone names. Once the per-contact timezone data has been set up, 'Contact Time Zone' will load as a default for journeys time settings. A back-up timezone is also required in case a timezone is not available for some contacts. Just like other timezone settings, local timezone will be used for any time-settings, including delay until specific time, active hours, or day-breaks in day delays.
Customize the experience
Journeys are meant to tell a story. With splits and actions, you can customize your journey to meet your business goal by personalizing to your customers based on your criteria. Options include:
- Branching: Route contacts into different branches so you can take different actions on each group
- Experiment: Try different actions on different groups that are split randomly to determine which marketing tool will work best
- Join: Combine contacts from branches and variants back together after a split
Branch
If you'd like to offer the contacts entering your journey tailored experiences based on segment membership, you can split the group by Branching.
- Add a Branching step. The Branching Details pane opens.

Branching
- Name your split. Add a note if desired.
Pro tipUse your mouse to zoom in and out and drag the canvas around. This is especially helpful when you have a larger campaign:
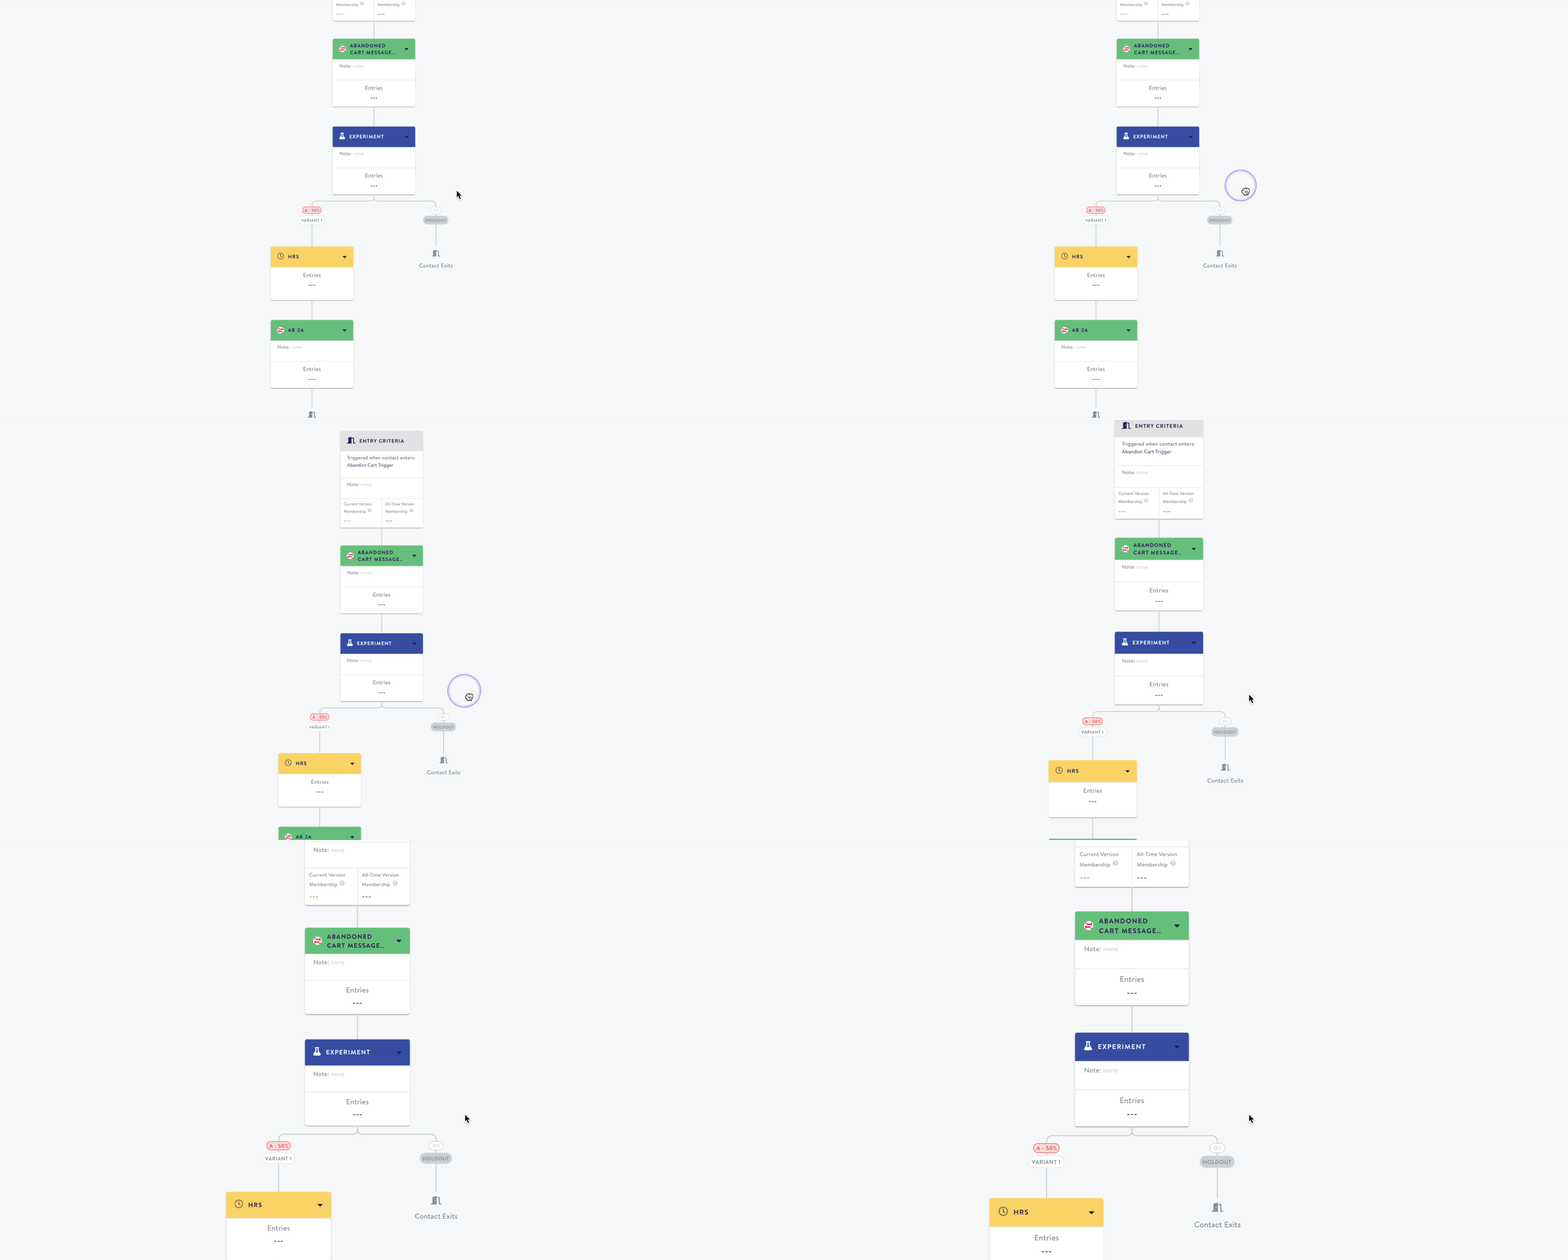
Drag and Zoom In the Editor
- You can include up to 10 branches, including the default branch. To add a new branch, click Add Split.
- Give the branch a unique name.
- From the first drop down, choose includes to route any contacts in that segment to this branch. Choose Excludes to keep any contacts in your specified segment from being routed to this branch.
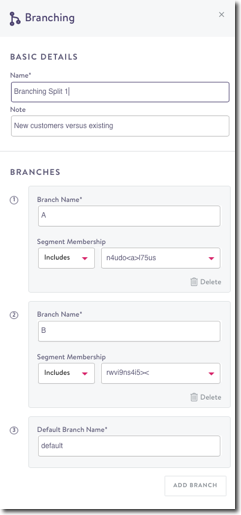
Branches
Remove BranchesIf you have more than two branches, you can remove any except the default branch as needed:
- Click the trash can icon. If there are steps associated with that branch, those steps will also be deleted.
You must have two branches remaining after you delete.
- Choose a Default Branch Name for any contacts not identified in the other branches to route to.
- Click anywhere in the editor window or click X to close the Branch Details pane.
You can branch at any step in your journey; repeat steps 10-11.
- To edit a branch, click the specific branch box.
- To delete a branching step entirely, use the branching box drop-down arrow, then click delete. Select a branch to keep and the remaining ones will be deleted.
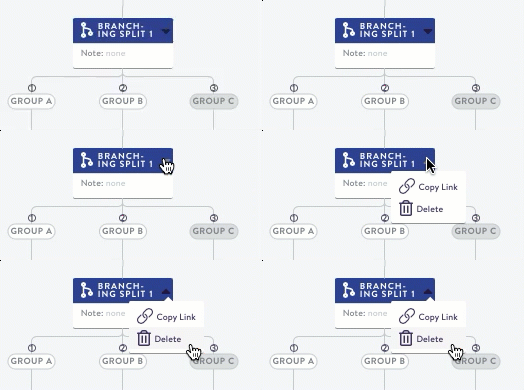
Delete Branch
Branch orderingBranch conditions are evaluated as they appear in the sidebar from top to bottom (or left to right on the canvas). Contacts will be routed to the first branch for which they meet the criteria. All contacts that do not meet the criteria of any preceding branches will be routed to the default branch.
Experiment
Run experiments to determine the most effective marketing tactics. For example, you could offer free shipping on Group A and a discount code on Group B to see which option increases sales the most. While branching assigns contacts based on specific criteria, experiments routes contacts randomly based on the configured weights.
- Add an Experiment. The Experiment Details pane opens.

Experiment
-
Name the experiment and include a note if desired.
-
If you'd like to include a Holdout Group (a control group), toggle the option on and specify what percentage of contacts should go to the holdout group.
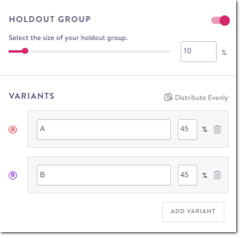
Variants
- Click Add Variant for each variant you want to include. You must have at least two variants or one variant and a holdout.
- Name each variant uniquely and either specify what percentage of contacts should go to this variant or click Distribute Evenly to auto-populate the percentage.
- Exit the details pane then select the corresponding action for the variant by clicking the +. You can choose to add more branches, experiments, or send communication to each variant. You can also choose to have no action for the variant. This is the recommended setting for holdouts.
- To remove a variant, click the trash can icon. An experiment must have at least two variants or one variant and a holdout.
- To delete an experiment step entirely, use the experiment box drop-down arrow, then click delete. You will be asked to select a variant to keep and the remaining ones will be deleted.
Be mindful when deletingDeleting a branch or variants with many steps connected deletes those steps. Deleting an entire split deletes all branches/variants except for the one you select to keep. This action can't be undone.
Join
Once you've branched or experimented, you may want to rejoin two branches or variants to avoid duplication if contacts will get the same experience from that point. Some examples for using a join are:
- You want to run an experiment for a specific step (e.g. a subject line test) and then let all contacts continue to the same step after that.
- You make a branching split based on customer preference (e.g. geography), but the next step is relevant to all contacts (e.g. a tutorial).
- Add a Join step. The Join Details pane opens. (Join is only an option if you have a previous split established.)

Join icon
- The branch or variant you are joining from highlights in pink. Click the + for to select the steps that you want to join it to.
- At the bottom of the editor, click join:
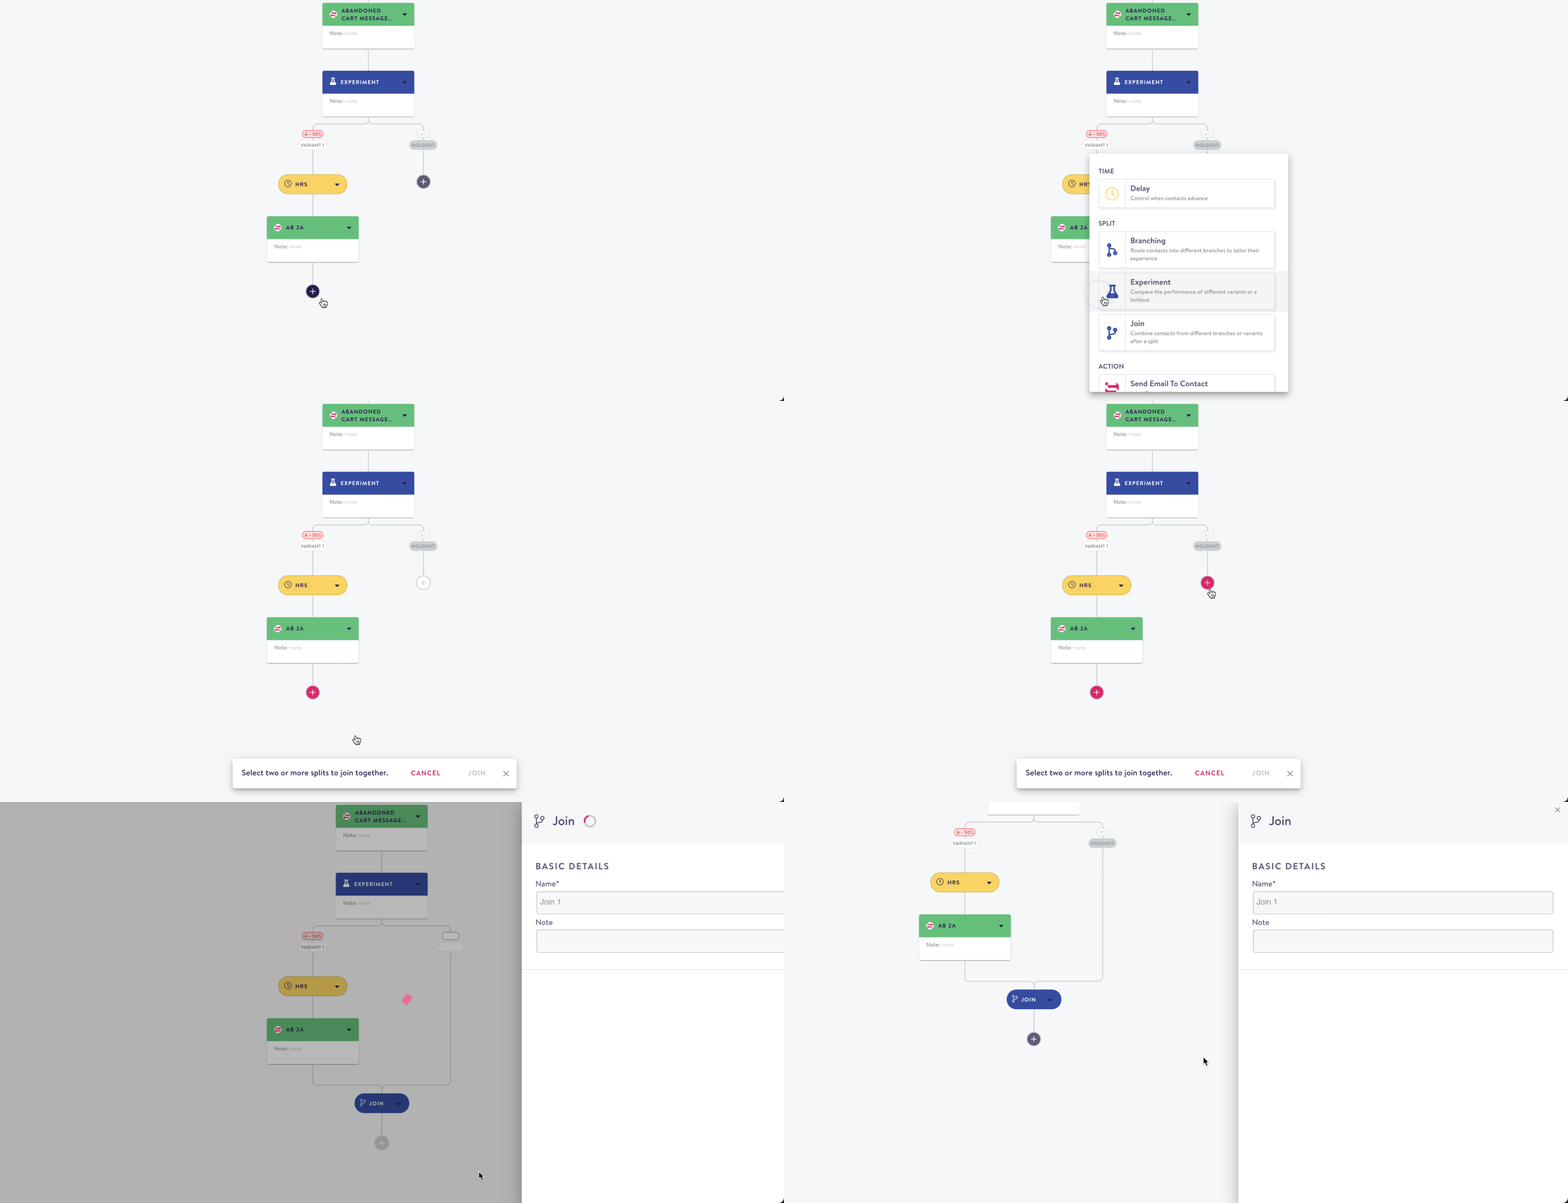
Join Two or More Branches or Variants
From this join, you can branch, experiment, join, or take action.
- To edit a join and add or remove connected steps, click the join box and select Modify Join. This is helpful when you add a new branch or variant to an already existing split.
Pro TipYou can re-use delays and steps.
- From a step box, click the drop down arrow and choose Copy Step the select a location to place the copy.
- From a delay, click the drop down arrow and choose Copy Link.
You can also copy a link step to send to share with a coworker, so they can easily find the exact step for a specific version. Click the link line, then click Copy Link.
Remove a Split
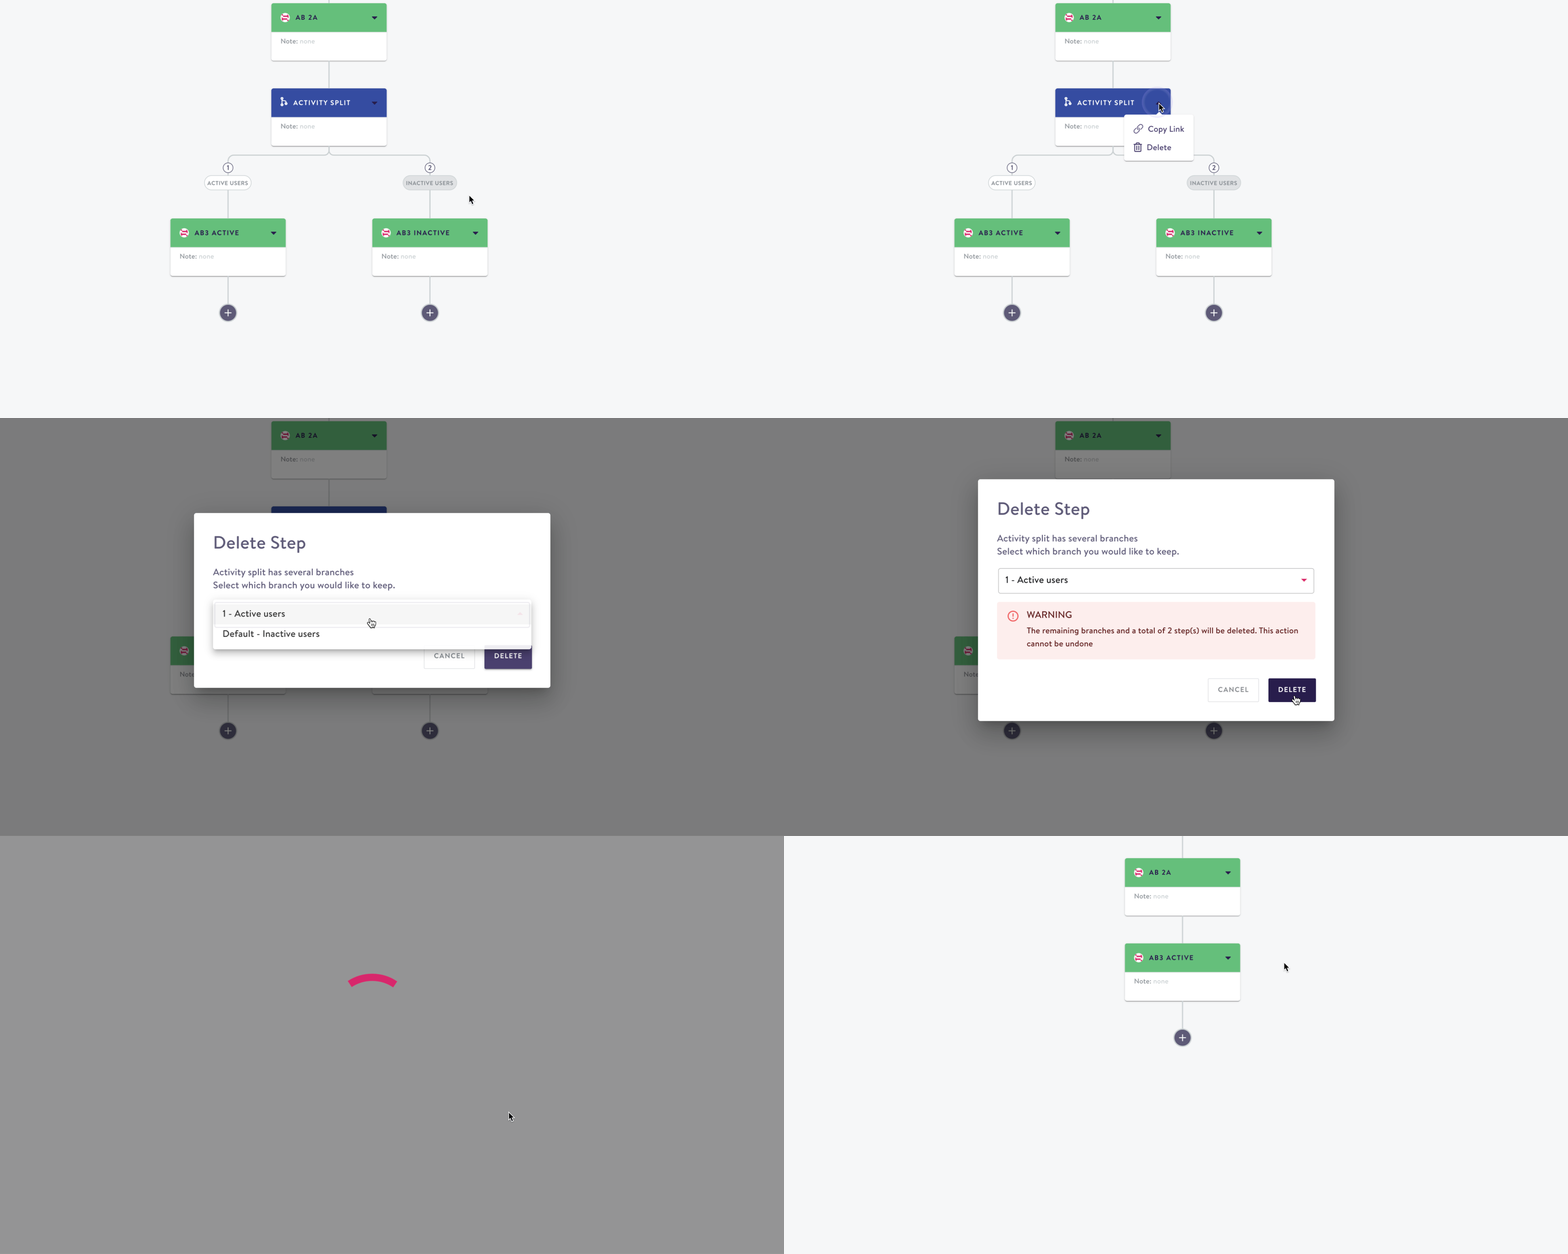
Remove a Split
To remove a step that has split into branches:
- From the drop down click Delete.
- You're prompted to choose which branch you want to keep; the other will be deleted.
Send Messages with Channel Actions
With Journeys Two, you can send messages with:
- Airship
- Klaviyo
- Oracle Responsys
- SendGrid
- Simon Mail and
- Twilio
- Click + then choose an action. (You can also choose no action if you're looking to make some space in your Journey layout).
Custom Context
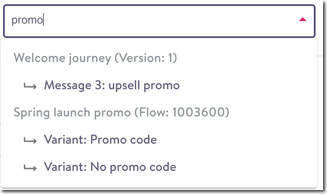
When adding metadata or custom context to an action, you have the option to copy fields that were previously configured either in other journey steps or in a flow.
Search by flow and variant name for flows (excluding archived flows), or journey and step name for second generation journeys. Actions with custom context configured will show up in the search results. If there are multiple variants or steps, they will be listed under the flow or journey name. The journey version is listed next to the journey name. You can also copy fields from a different journey step in the same journey.
custom context
Send Triggered Email to Contact
You can add an action before you have finalized templates, settings etc. The steps will be saved and you can complete the set-up later.
-
Name the action and include a note if desired.
-
In Email Details, complete:
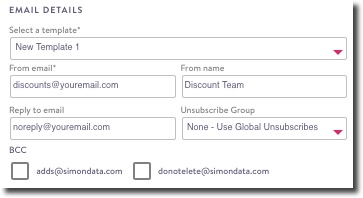
- Select a template: See Custom context basics for more about email templates. From this drop down, start trying to search for the template you want to use in this email.
- From email: The return address that appears on the email to the contact. For example, [email protected]
- From name: The sending name you want the contact to see
- Reply to email: The inbox you want any replies to this email to go to
- Unsubscribe Group: Set your unsubscribe preferences in SendGrid.
- BCC: Set your BCC options in settings.
- Check the box if you'd like to override any SendGrid UTM Settings.

Google Analytics Tracking
- Add any Custom context expressions:

Custom Context
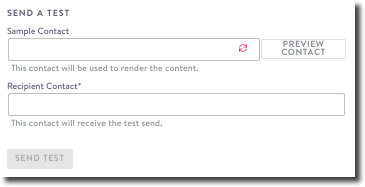
- Send a test:
Send a test
- Choose a Sample Contact. Click preview contact to ...
- Choose a Recipient Contact.
- Click Send Test.
For more details on SendGrid Metadata, see below.
Send Triggered Email to Contact with Simon Templates
Follow the steps above for Send Triggered Email to Contact with one difference. Under Email Details, you can preview available templates by clicking View Simon Templates in Content:

View Simon Templates in Content
Metadata
Add metadata to track in your Journey history in the action step:

Journey History Metadata
Simon Mail and SendGrid metadata
Send metadata to SendGrid or Simon Mail (if you use either) in Channel Metadata. These values are then reflected in engagement events.

Channel Metadata
The default fields included for Simon Mail and SendGrid metadata are:
j2_journey_id: journey id, an automatically generated id for the journey (similar tojourney_idin journeys 1 metadata).j2_journey_version: the journey version number, automatically increasing with each new published version, starting with 1 and increasing with every new released version.j2_step_id: an automatically generated id for the step (similar tosimon_flow_idin flows / journeys 1 metadata).operation_id: a unique identifier for a contact passing through a step one particular time. This is also available in jinja assimon.operation_idand can be used to join to other sources like journey history.j2_name: journey name. This is user-configured and has to be unique among journeys that have been published (similar tojourney_namein journeys 1 metadata).j2_step_name: step name. This is user-configured and has to be unique within a journey version (similar tosimon_flow_namein flows / journeys 1 metadata).
Updated 3 months ago
